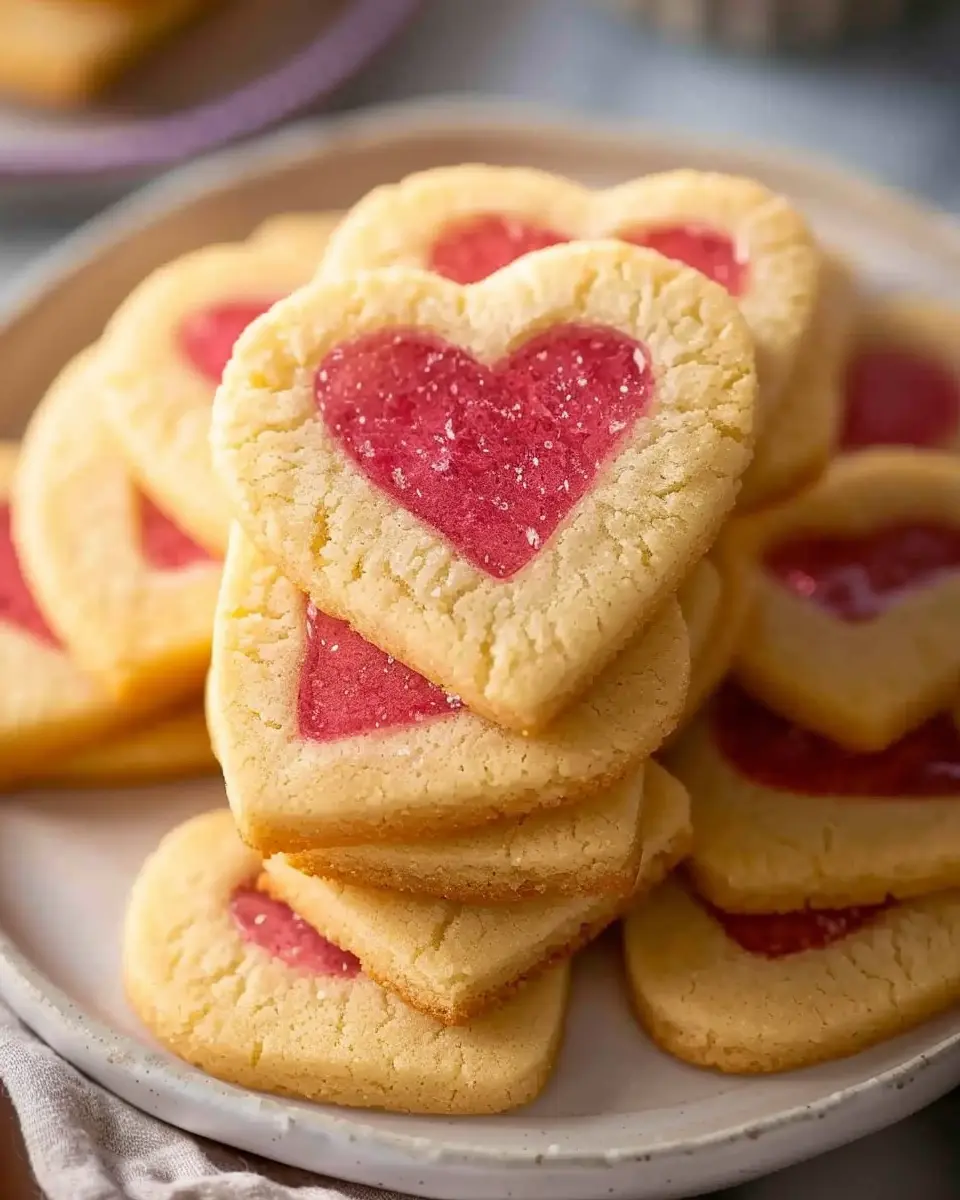
Introduction to Slice and Bake Heart Cookies
When life gets busy, finding time to indulge in baking can seem daunting—especially for young professionals. That’s precisely where slice and bake heart cookies come into play. These delightful treats blend simplicity with a personal touch, allowing you to enjoy the comforting ritual of baking without devoting an entire Saturday to the process.
Why Slice and Bake Heart Cookies are Perfect for Young Professionals
Imagine this: you’ve had a long day at work, and the thought of whipping up a batch of cookies from scratch feels overwhelming. Enter the magic of slice and bake cookies! With this method, the dough is prepared ahead of time which means all you need is to slice, bake, and enjoy.
-
Time-Saving: The biggest advantage of slice and bake heart cookies is their quick prep time. You can make the dough on a relaxed evening, roll it up like a log, chill it, and store it in the fridge or freezer. When a craving hits—or a friend drops by unexpectedly—you simply slice off a few pieces and bake. It’s as easy as that!
-
Endless Personalization: Want to make them chocolatey? Add cocoa powder; feeling festive? Toss in some sprinkles or dried fruit! This adaptability means that these cookies never get boring, helping you impress guests or unwind after a hectic day.
-
Storable Treats: As a young professional, you may not have the luxury of baking every week. By preparing the dough in advance, you can have home-baked goodness whenever you need it. Plus, they make a wonderful gift, especially when shaped into charming heart designs—perfect for someone special!
For additional inspiration and further reading on the joy of baking, consider checking out The Spruce Eats or Serious Eats. These resources are fantastic for discovering innovative recipes and baking techniques that fit seamlessly into a busy lifestyle.
In conclusion, slice and bake heart cookies are not only a joy to eat but an incredibly convenient option for the modern professional. They make it easy to bring a little sweetness to your day, even when you’re short on time.

Ingredients for Slice and Bake Heart Cookies
Essential Ingredients for the Dough
To create delightful slice and bake heart cookies, you’ll need a few essential ingredients that form the foundation of your dough. Here’s what you’ll need:
- Unsalted Butter: About one cup, softened to room temperature for a creamy texture.
- Granulated Sugar: A cup will give your cookies that sweet crunch.
- Brown Sugar: Adding half a cup of this will contribute to a chewier cookie.
- Egg: Just one large egg helps bind everything together.
- Vanilla Extract: A teaspoon or two for a warm, inviting flavor.
- All-Purpose Flour: Two and a half cups will create that perfect dough consistency.
- Baking Powder: A teaspoon ensures your cookies rise beautifully.
Fun Additions for Customization
The real beauty of slice and bake heart cookies lies in the ability to customize them to your taste! Consider these fun additions:
- Chocolate Chips: Semi-sweet or dark—it’s your call, and they add a lovely texture.
- Nuts: Chopped walnuts or pecans add a satisfying crunch.
- Sprinkles: Perfect for decorating festive cookies or just to brighten up your day.
- Zest: A hint of lemon or orange zest can bring a refreshing twist.
Feel free to experiment! For inspiration, check out The Cookie Countess, where you can find creative decorating ideas. And don’t forget to share your cookie-making adventures!
Preparing Slice and Bake Heart Cookies
If you’re looking for a delightful recipe that combines creativity and sweetness, slice and bake heart cookies are the perfect choice! With their charming shape and customizable colors, these cookies not only taste great but also make for a lovely gift or a special treat for yourself. Let’s dive into the preparation steps to make this easy and enjoyable.
Gather your ingredients and tools
Before you start your baking journey, gather all the necessary ingredients and tools. Here’s a quick checklist:
-
Ingredients:
-
2 ½ cups all-purpose flour
-
1 cup unsalted butter, softened
-
1 cup sugar
-
1 large egg
-
2 teaspoons vanilla extract
-
½ teaspoon baking powder
-
Pinch of salt
-
Food coloring (your choice of colors)
-
Tools:
-
Mixing bowls
-
Electric mixer or whisk
-
Plastic wrap
-
Baking sheet
-
Parchment paper
-
Cookie cutter (heart-shaped)
Having everything laid out will streamline the process and make it more enjoyable!
Make the cookie dough
To whip up the cookie dough, start by creaming the butter and sugar in a mixing bowl until it’s light and fluffy. You can use an electric mixer for this or a good old-fashioned whisk if you’re feeling energetic! After it’s well blended, add the egg and vanilla extract, mixing until combined.
In a separate bowl, whisk together the flour, baking powder, and salt. Gradually incorporate the dry ingredients into the wet mixture. Once you’ve formed a cohesive dough, it’s time to split it into portions for coloring.
Chill and shape the colored dough
This is where the fun begins! Divide your cookie dough into two or more portions depending on how many colors you’d like to use. Add food coloring to each portion, kneading it until the colors are fully incorporated.
Once your dough is colorful, shape each portion into a log, approximately 1-2 inches in diameter. Wrap them tightly in plastic wrap and refrigerate for at least two hours. This chilling is crucial—it helps the dough firm up, which will make slicing easier later.
Cut out the heart shapes
After the dough has chilled, it’s time to cut out those adorable heart shapes. Take one of your dough logs from the fridge and slice it into ¼-inch thick pieces. Use a heart-shaped cookie cutter to press down on each piece, creating the heart shape. Note that this step is not only fun but allows you to get creative with your cookie designs.
Don’t forget to place the heart shapes on a parchment-lined baking sheet, leaving a little space between each to allow for spreading while baking.
Assemble the cookie log and freeze
If you’re feeling adventurous, you can assemble your colored dough logs into a beautiful pattern! Layer the colored dough slices in an alternating pattern and roll them together for a festive look. Once you’ve created your desired design, wrap the entire log in plastic wrap again and place it in the freezer for about 30 minutes. This will ensure your shapes remain intact while baking.
Slice and bake the cookies
Finally, it’s showtime! Preheat your oven to 350°F (175°C). Once the oven is ready, slice the chilled cookie log into ¼-inch pieces and place them back on the prepared baking sheet. Bake for 8-10 minutes until they are slightly golden around the edges but still soft.
Cool the cookies on a wire rack, and voila! You have delicious slice and bake heart cookies ready to devour or gift. Enjoy with a glass of milk or a cozy cup of tea!
Baking these cookies doesn’t just yield tasty results; it also brings a lovely warmth to your kitchen and creates delightful memories. So gather your loved ones, pick those cookie cutters, and enjoy this sweet experience together! For more baking tips, check out Food Network’s baking guide.

Variations on Slice and Bake Heart Cookies
When it comes to making slice and bake heart cookies, there’s so much more you can explore than just the basic recipe! Let’s dive into some delightful variations that will leave you and your loved ones craving more.
Customize Your Heart Cookies with Different Colors
One of the joys of baking is letting your creativity shine! Transform your heart cookies into cheerful treats with vibrant colors. Here’s how you can do it:
- Food Coloring: Divide your dough into portions and add a few drops of gel food coloring. Knead until the color is evenly distributed. Think pastel pinks for Valentine’s Day or vibrant reds for a festive occasion!
- Decorative Sugar: Before baking, sprinkle colored sugar or edible glitter on top of your cookies. This adds a delightful crunch and makes each cookie sparkle with personality.
For ideas on color combinations, you can check out resources like Kitchen Fun with My 3 Sons, where the creativity seems endless!
Add Flavor Twists to the Basic Recipe
Why stick to plain vanilla when you can jazz things up with unique flavors? Here are a few ideas:
- Citrus Zest: Adding zest from lemons or oranges can elevate your slice and bake heart cookies with refreshing brightness.
- Spices: A dash of cinnamon or nutmeg can impart warmth and depth to the flavor profile.
- Extracts: Swap out vanilla extract for almond or coconut for a delightful twist.
These substitutions not only make the cookies standout but also allow them to cater to various palates. Remember to taste as you go—who knows what delightful creation you might invent!
Experimenting with these variations not only makes baking fun but also allows you to share unique creations with friends and family. What flavor or color combination will you try first?
Cooking Tips and Notes for Slice and Bake Heart Cookies
Importance of Chilling the Dough
Chilling the dough is an essential step when making your slice and bake heart cookies. When you wrap the dough and let it chill in the refrigerator, it firms up, which helps the cookies maintain their shape during baking. This process also intensifies the flavors. Ideally, aim for at least an hour, but if you can wait overnight, those cookies will be even better! Not sure how to chill? Wrap the logs tightly in plastic wrap to prevent drying out.
How to Prevent Your Cookies from Spreading
To keep your slice and bake heart cookies perfectly shaped, avoid overworking the dough, as this can lead to spreading. Here are a few tricks:
- Use cold ingredients: Start with cold butter and keep the dough chilled before baking.
- Bake on parchment paper: This helps with even cooking and reduces any unwanted spreading.
- Check your oven temperature: Keeping a consistent temperature is key. An oven thermometer can help ensure accuracy.
By following these tips, you’ll be well on your way to creating beautiful heart-shaped cookies that are as delightful to look at as they are to eat! For more baking insights, consider checking out King Arthur Baking for expert tips.

Serving Suggestions for Slice and Bake Heart Cookies
Serve them on special occasions
When it comes to slice and bake heart cookies, they’re the perfect treat for various occasions. Whether it’s a cozy Valentine’s Day gathering, a whimsical birthday celebration, or simply a sweet addition to a picnic, these cookies fit right in. Their charming shape and vibrant colors make them an inviting centerpiece for any dessert table. Imagine presenting a beautiful platter of these cookies, sprinkled with colorful decorations, and watch your guests’ faces light up with joy!
Pairing ideas for enhanced enjoyment
To elevate your slice and bake heart cookies experience, consider some delightful pairings:
- Coffee or Tea: A freshly brewed cup of coffee or a steaming pot of herbal tea can perfectly complement the sweetness of the cookies.
- Fresh Fruits: Juicy strawberries or tart raspberries add a refreshing balance to the richness of your cookies.
- Cheese Board: For a sophisticated twist, serve them alongside a selection of creamy cheeses. The contrast is simply divine!
These combinations not only enhance the flavors but also create an inviting atmosphere to enjoy your delightful cookies. Looking for more inspiration? Check out resources like Taste of Home, which offer fantastic pairing ideas. Happy baking!
Time Breakdown for Slice and Bake Heart Cookies
Preparation time
Getting started with your slice and bake heart cookies is a breeze. You’ll need about 15-20 minutes to gather your ingredients and mix everything together. This includes measuring flour, butter, sugar, and other essentials. Pro tip: make sure your butter is at room temperature for easy mixing!
Chilling and baking time
Once prepared, the dough requires some chill time—aim for a solid 1-2 hours in the fridge. This step is crucial for maintaining that perfect texture. When you’re ready to bake, you’ll spend about 10-12 minutes in the oven. Keep an eye on them so they come out just right!
Total time
All said and done, you’re looking at roughly 1.5 to 2.5 hours from start to finish, depending on how long you choose to chill the dough. This makes these slice and bake heart cookies a sweet treat you can whip up even on a busy day! Plus, if you want detailed tips on baking times, the American Institute of Baking has some great resources. Happy baking!
Nutritional Facts for Slice and Bake Heart Cookies
Caloric Content
Indulging in slice and bake heart cookies is a delightful treat, but it’s good to be aware of what you’re enjoying! Each cookie (about 30 grams) typically contains around 150 calories. If you’re counting calories, sharing these cute hearts or savoring just one can keep you on track while still enjoying a sweet touch.
Key Nutritional Components
These heart-shaped delights pack a mix of fun and nutrition:
- Fats: Around 7 grams per cookie, primarily from butter. Opting for unsalted butter can help control sodium intake.
- Carbohydrates: Each cookie has about 20 grams of carbs, perfect for a quick energy boost.
- Sugars: You’ll find about 8 grams of sugar per cookie, which creates that lovely sweetness.
- Protein: Surprisingly, each cookie offers around 1.5 grams of protein, thanks to the egg and flour.
Remember, moderation is key! If you’re interested in diving deeper into the nutritional benefits of specific ingredients, check out resources like NutritionData and Healthy Eating for more insights.
FAQs about Slice and Bake Heart Cookies
Can I make these cookies vegan?
Absolutely! Transforming your slice and bake heart cookies into a vegan treat is easy. Simply substitute the butter with coconut oil or a plant-based butter alternative. For the eggs, you can use flaxseed meal (1 tablespoon of flaxseed mixed with 2.5 tablespoons of water per egg) or unsweetened applesauce (1/4 cup per egg). This way, you can enjoy your cookies without compromising on taste.
How long can I store the cookie dough in the freezer?
Good news! You can store the slice and bake heart cookies dough in the freezer for up to three months. Simply roll the dough into logs, wrap them tightly in plastic wrap, and place them in an airtight container or a freezer bag. When you’re ready to bake, just slice the frozen dough into rounds and bake without needing to thaw!
What cookie cutters work best for these heart cookies?
For slice and bake heart cookies, metal cookie cutters work wonders! They cut through the dough easily and retain their shape while baking. If you’re feeling creative, try using festive or themed cookie cutters based on the occasion. Remember, the size matters; larger cutters create thicker cookies, while smaller ones lead to a thinner, crispier outcome. Don’t forget that comfort and functionality are key—be sure to select cutters with a smooth edge for best results!
By answering these FAQs, we hope to simplify the cookie-making process for you! For more baking tips, check out The Kitchn or Allrecipes. Happy baking!
Conclusion on Slice and Bake Heart Cookies
Making slice and bake heart cookies is not just about the delicious final product; it’s about the joy of creating something special at home. Whether for a loved one or a festive gathering, there’s an undeniable warmth in sharing homemade treats.
As you roll, chill, and slice those delightful hearts, remember that the kitchen is a space for creativity. Don’t hesitate to mix in your favorite flavors or decorations! The process can teach us patience and the delight of nurturing our culinary skills. So, gather your friends or family, and turn an ordinary day into a sweet occasion with your lovely heart cookies. Happy baking!
For more inspiration, check out resources like American Heart Association or Food Network’s Baking Tips.
PrintSlice and Bake Heart Cookies: The Easy Way to Share Love

These Slice and Bake Heart Cookies are the perfect treat to share with loved ones. With a simple recipe, you can create beautiful heart-shaped cookies that bring joy.
- Prep Time: 15 minutes
- Cook Time: 12 minutes
- Total Time: 1 hour 27 minutes
- Yield: 24 cookies 1x
- Category: Desserts
- Method: Baking
- Cuisine: American
- Diet: Vegetarian
Ingredients
- 2 cups all-purpose flour
- 1 cup unsalted butter, softened
- 1 cup granulated sugar
- 1 large egg
- 1 teaspoon vanilla extract
- 1/2 teaspoon salt
- 1/2 teaspoon baking powder
Instructions
- Preheat the oven to 350°F (175°C).
- In a bowl, cream together the butter and sugar until light and fluffy.
- Beat in the egg and vanilla extract.
- In another bowl, whisk together flour, salt, and baking powder.
- Gradually add the dry ingredients to the wet ingredients, mixing until combined.
- Divide the dough in half and shape into logs. Wrap in plastic wrap and refrigerate for at least 1 hour.
- Slice the chilled logs into 1/4 inch thick slices.
- Place the slices on a baking sheet lined with parchment paper.
- Bake for 10-12 minutes or until edges are golden.
- Let cool on a wire rack before serving.
Notes
- For added flavor, you can mix in some lemon zest or chocolate chips.
- Keep the dough wrapped well to prevent it from drying out.
Nutrition
- Serving Size: 2 cookies
- Calories: 150
- Sugar: 10g
- Sodium: 50mg
- Fat: 8g
- Saturated Fat: 5g
- Unsaturated Fat: 3g
- Trans Fat: 0g
- Carbohydrates: 20g
- Fiber: 0g
- Protein: 2g
- Cholesterol: 20mg
Keywords: Slice and Bake Heart Cookies